How to Use the Bill Management Module
Keep Track of Your Bills Too
The Undebt.it bill management module was built from the ground up and designed to handle your recurring, non-debt expenses such as cable, phone, utilities, etc. Bill management is part of the optional Undebt.it+ suite and can be turned off if you don’t want to use it. Here are some of the highlights:
- Repeat bills every x months or years
- Automatically record bill payments (autopay)
- Add unlimited bill accounts
- Bill Dashboard groups outstanding bills into groups (past due, due within 7 days, and due within 30 days)
- SMS/text message payment reminders
- Bill history
The first thing that needs to be done if you want to use bill pay is to sign up for Undebt.it+. You can also enable the free 30 day trial if you would like to see how it works first.
I have reset the trial period for all users on 9-10-2015, so if you have already used the trial you can use it again to see how you like bill pay.
After you sign up or enable the trial, head over to the My Account page and go to the Profile Settings tab. At the bottom, you’ll see an option to turn on/off the bill management module. It is off by default.
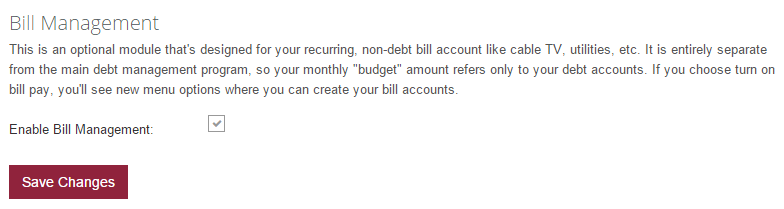
enable the bill pay module
new bill menu options
You’ll notice that the menu structure has changed a little. There are two new entries in this menu Bill List & Bill Dashboard.
Bill List & Details
The Bill List page is the one you’ll want to start with first. This where you setup all of your bill account information. Just fill in the fields and click on the Save Info button. You will then see the newly created account in the bill list. Repeat the process for each bill account. Remember, this is only for non-debt types of bills.
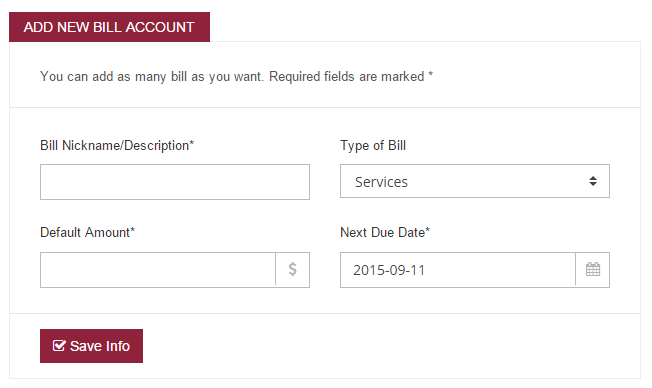
new bill account setup
Once you add all of your bill accounts, you can click on the account name in the bill list to get to the account details page. This where you can change additional accounts settings like repeat frequency, autopay and reminder days.
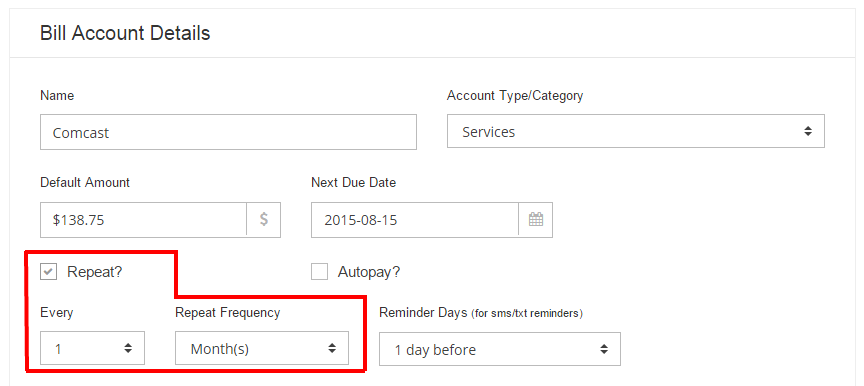
bill account settings
Most of your accounts should be set to repeat. What this does is automatically create the monthly bill entries for you so you don’t have to manually enter them. Another option you’ll see is the Autopay? option. This is for bills that are automatically deducted from your account. For example, if you have your city utilities setup to automatically debit your checking account on the 15th of every month, you’ll want to enable the autopay option. Bill payments will automatically be recorded on the bills due date and the next due date will be updated. The last option on this screen is for Reminder Days. This will let you get text message payment reminders x days before the bills is due. If you don’t want to get any reminders this account, just set the reminder days to 0.
Bill Entries
The next section this page allows you to create your monthly bill entries. You’ll need to use this section if the bill account is not set to repeat. It’s important to know the difference between bill entries and bill accounts. “Bill entries” are the individual monthly/yearly bills themselves. Each bill entry has its’ own due date and bill amount. “Bill accounts” are the main (parent) accounts which show up in the bill list.
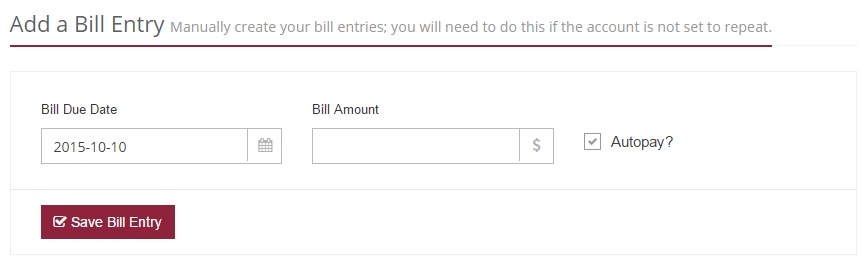
manual bill entry
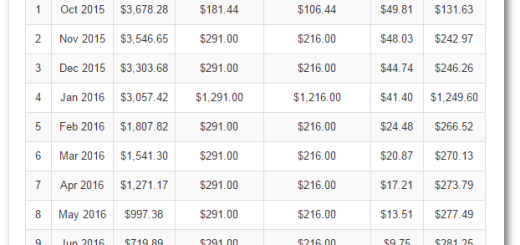
The last section on this page shows the monthly bill history. You’ll see a box for each individual bill entry showing how much the bill was and when it was paid. Multiple payments per bill are supported, so if you’ve made more than one payment for the bill entry, you’ll see them here. Bills are listed from newest to oldest.
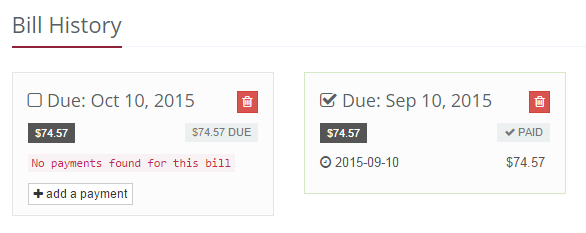
monthly bill entries
In the example above, the box on the first box shows the current (unpaid) bill which is due on 10-10-2015. Notice the “add a payment” button. Click the button and another window will come up where you can enter the payment transaction information. The bill on the right shows the (paid) bill from last month. The bill was due on 9-10-2015 and paid in full on 9-9-2015. The paid bills have a small green border around them while past due bills are bordered in red and current bills are grey. The red “trash” icon deletes the bill entry.
The Bill Dashboard
The other new page that you’ll see is the Bill Dashboard which is very similar to the Debt Dashboard that you’re already familiar with. Here you will see your upcoming bills grouped in three different areas: past due, due within 7 days and due within 30 days.
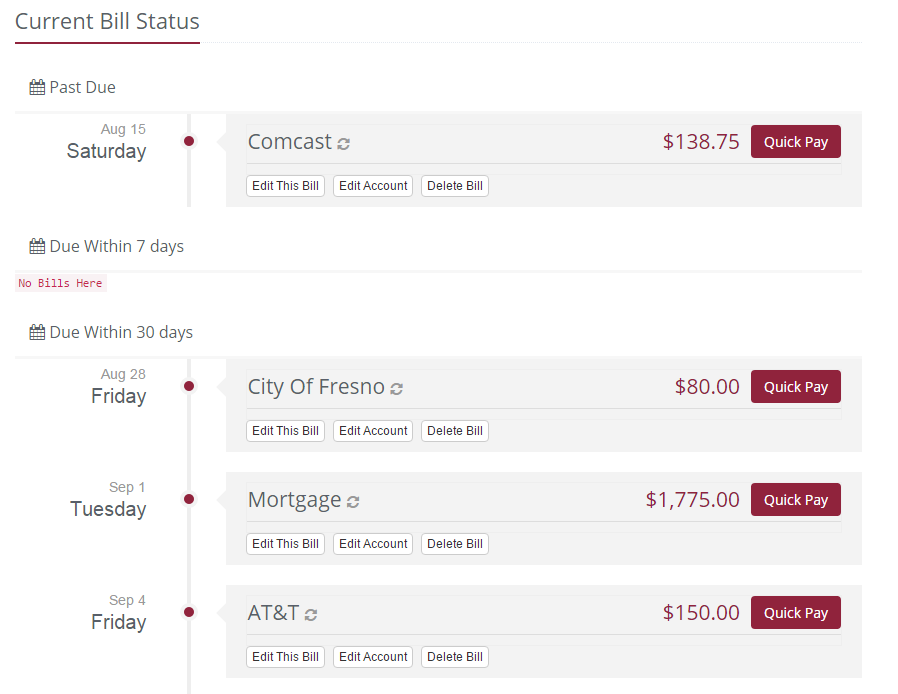
the bill dashboard
If the account is set to repeat or autopay, you see a corresponding icon next to the account name. You’ll see three buttons below the account name:
- “Edit This Bill” refers to the individual monthly/yearly bill entry.
- “Edit Account” gets you to the bill account details shown in the section above.
- “Delete Bill” deletes the individual bill entry. This is the same as clicking on the trash icon in the Bill History section shown above.
Just like the Debt Dashboard, there is a Quick Pay button. Clicking on the button will mark the bill as paid and create a payment transaction which you’ll see in the Recent Transactions section on the left side menu.
Notes & Tips
- In the screenshot of the Bill Dashboard, you’ll notice that I have my mortgage in there. Of course, it’s a “debt” account but I chose not to make it part of my debt payoff program. The reason is that I wanted a realistic debt payoff progress percentage. My main focus is paying down consumer debt, so if I was to add my mortgage to the debt payoff plan, my overall progress would be somewhere around 10% and would only go up very slowly because of the large balance due on the mortgage. Excluding the mortgage means that my payoff percentage is close to 60% and I can see it rising every month. I added it as a bill just to make sure I remember to pay it.
- Multiple payments per bill are supported. If you have a large yearly bill for example, you can multiple payments towards it and they will be tracked correctly.
- The bill reminders work the same way as debt reminders. You can choose the reminder days per bill.
- Custom bill categories are coming soon.
should I add the amount I pay towards bills in my Total Budget or is that only for debts being snowballed?
Total budget is for debts only
Does the quick pay actually pay the bill to the creditor or simply show the transaction?
It does not pay the bill, just records the transaction
I tried to update some of our monthly bills b/c the amounts have change (i.e. Netflix from $10.99 to $12/mth). I change the default amount and update, but it doesn’t change the current bill amount… how do I update that? Thanks!
You can change it on the dashboard or on the history tab of the bill details page
Does bill management also utilize YNAB API?
No, it’s just for debt accounts
Thank you for your response can bills turned off ?
Yes – on the my account page, options tab
If I may request a feature, Jeff, it would be awesome if the bill module rolled the difference between what I budgeted and what I paid into my snowball. If I budgeted $100 for electric and only paid $80, that $20 left could pay down my debt!